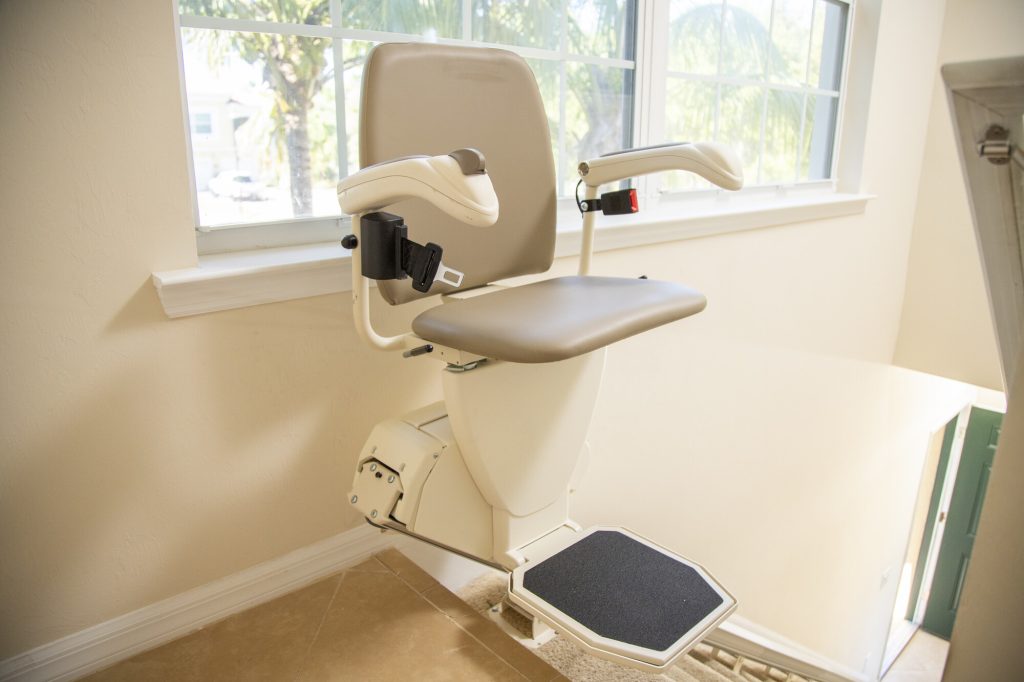
For seniors aging in place and individuals recovering from mobility limitations, remaining independent in a multi-story home is a top priority. When climbing stairs becomes unsafe or painful, a residential stair lift is often the fastest, most economical solution. However, once you decide to invest in a lift, one critical question arises: how does stair lift installation actually work?
Navigating home requirements, electrical setups, staircase measurements, and deciding between professional installation versus DIY kits can feel overwhelming. Many online guides oversimplify the process or push dangerous self-installation methods to sell boxed products without addressing safety standards.
In this comprehensive guide, we synthesize technical requirements, step-by-step installation protocols, realistic costs, and critical safety guidelines to ensure your home stair lift installation is executed flawlessly.
Pre-Installation Home Requirements: Is Your Staircase Ready?
Before ordering or scheduling a stair lift installation, your home must meet specific architectural and technical prerequisites. Contrary to common belief, stair lifts attach to the stair treads not the wall meaning drywall construction plays no role in supporting the lift.
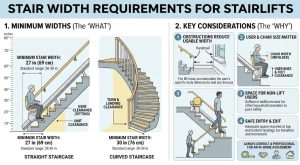
1. Minimum Staircase Width
- Straight Stair Lifts: Requires a minimum staircase width of 28 inches (30–32 inches is recommended for maximum knee clearance).
- Curved Stair Lifts: Requires a minimum width of 30 to 36 inches due to the wider turning radius on curves, turns, and intermediate landings.
2. Stair Tread Material & Structural Integrity
Stair lifts are anchored using heavy-duty mounting brackets screwed directly into the tread steps. Supported materials include:
- Hardwood & Carpeted Wood: Standard wood screws secure directly into subflooring or solid treads.
- Concrete or Tile Steps: Concrete masonry anchors are drilled to secure brackets.
- Metal Stairs: Reinforced steel clamps or specialized brackets ensure rigid stability.
3. Clearance at Top and Bottom Landings
Obstructions near doorways or hallways can pose trip hazards or block swivel seat operation:
- Bottom Landing: Needs at least 18 to 24 inches of clear floor space at the bottom for safe mounting and dismounting.
- Top Landing: Requires 24 to 30 inches of space so the user can swivel the seat safely onto the upper landing without risking a fall down the stairs.
- Doorway Obstruction Solution: A power folding rail (hinged rail) automatically folds the bottom track up when the lift parks higher up the stairs.
4. Electrical Power Outlets
Modern stair lifts run on internal DC batteries continuously charged via a standard 110V/120V household AC outlet located near the top or bottom of the staircase.
Step-by-Step Stair Lift Installation Process
Understanding what happens on installation day ensures peace of mind. A certified technician completes a standard straight stair lift installation in 2 to 4 hours, while custom curved installations take 4 to 8 hours.
Step 1: Laser Measurement & Rail Customization
The technician measures the exact angle, rise, and length of the staircase using digital level gauges or photo-metric scanning. For straight lifts, aluminum rail tracks are cut on-site to fit the precise stair incline.
Step 2: Securing Mounting Brackets to Treads
Mounting feet are aligned along the rail track and screwed directly into the stair treads (typically 2 to 6 screws per bracket). Brackets are spaced roughly every 2 to 3 steps to distribute weight evenly.
Step 3: Track Assembly & Charge Strip Routing
Rail segments are joined seamlessly using heavy-duty alignment pins. The continuous internal copper charging strip (or point-charge contact pads) is routed inside the rail to keep internal batteries charged.
Step 4: Mounting the Carriage Motor & Swivel Chair
The motorized carriage housing the gear motor and circuit boards is slid onto the track rack-and-pinion system. The swivel seat assembly, armrests, and footrest are mounted and leveled.
Step 5: Wiring, Calibration & Safety Sensor Testing
The unit is connected to the transformer and wall outlet. The technician calibrates upper and lower limit switches, tests remote call/send controls, and verifies under-footrest safety sensors.
Step 6: User Demonstration & Operational Training
Before leaving, the installer provides hands-on user training covering seatbelt operation, swivel levers, key locks, battery backup descent, and emergency manual hand-cranks.
Professional Stair Lift Installation vs. DIY Self-Installation
While some online retailers promote ‘DIY self-install stair lifts’ to cut costs, self-installation carries severe risks. Below is a side-by-side comparison:
| Evaluation Factor | Professional Local Installation | DIY Self-Installation Kits |
| Manufacturer Warranty | 100% Validated (Parts & Labor Coverage) | Voided immediately by major manufacturers (Harmar, Bruno, Stannah) |
| Safety & Code Compliance | Fully Compliant with ASME A18.1 & local permits | High risk of improper pitch, loose mounting, or electrical code violations |
| Installation Time | 2 to 4 Hours (Turnkey service) | 6 to 12 Hours (Requires heavy lifting & power tools) |
| Weight Capacity Safety | Calibrated & weight-tested on-site | Risk of rail sag or bolt shear under load if anchored incorrectly |
| After-Sales Support | Local technician emergency service & repairs | Self-troubleshooting via phone; owner pays for shipping replacement parts |
| ★ SAFETY WARNING: THE HIDDEN COSTS OF DIY Attempting to install a stair lift without certified technical training risks catastrophic bracket detachment, improper rack-and-pinion gear meshing, and complete voiding of your factory warranty. Always hire certified factory technicians. |
How Much Does Stair Lift Installation Cost?
Stair lift pricing includes two core components: the lift unit equipment and the professional installation labor fee.
Straight Stair Lift Installation Costs
- Standard New Straight Lift: $2,800 – $5,000 Total
- Professional Installation Fee: $500 – $1,200 (Included in package pricing by certified local dealers)
Curved Stair Lift Installation Costs
- Custom Curved Lift: $9,500 – $15,000+ Total
- Professional Installation Fee: $1,500 – $3,000 (Reflects custom tube fabrication, digital scanning, and multi-turn alignment)
Factors Driving Installation Costs:
- Adding a folding rail for doorway clearance adds $800 – $1,500.
- Installing outdoors requires weatherized covers, specialized heat-treated mounting hardware, and sealants.
- Heavy-duty models (400 to 600 lbs capacity) require heavy-gauge rails and double-bracket anchoring.
Post-Installation Maintenance & Care Checklist
To maintain smooth, whisper-quiet operation and maximize lift lifespan (typically 10 to 15 years), follow this preventative maintenance schedule:
Monthly User Maintenance:
- Wipe down the aluminum rail track with a dry microfiber cloth to remove dust and pet hair.
- Check safety edge sensors on the footrest and carriage sides by pressing them gently.
- Ensure the lift parks on charge contact points at the top or bottom of the stairs.
Annual Professional Maintenance:
- Inspect rack-and-pinion gear teeth for wear and apply specialized clear grease.
- Test internal DC battery voltage and load capacities (replace batteries every 3 to 5 years).
- Check tight torque levels on all stair tread bracket lag screws.
Frequently Asked Questions (FAQs)
Q1. Will stair lift installation damage my walls or home decoration?
No. Stair lifts attach exclusively to the stair treads using small mounting brackets. No wall anchors or drywall modifications are required, preserving your home decor completely.
Q2. How long does it take to install a stair lift?
A straight stair lift installation takes 2 to 4 hours. A custom curved stair lift installation takes 4 to 8 hours depending on staircase complexity.
Q3. Does installing a stair lift require major electrical wiring?
No. Stair lifts plug into a standard 110V/120V household wall outlet using a standard transformer plug. The lift runs on internal 24V DC batteries charged through the rail.
Q4. Can a stair lift be installed on outdoor steps?
Yes. Specialized outdoor stair lifts feature weather-resistant aluminum rails, marine-grade vinyl seating, waterproof covers, and sealed motor housings designed for rain, snow, and UV exposure.
Q5. What happens to the stair lift during a power outage?
Because stair lifts are powered by internal rechargeable batteries, the lift will continue to operate for 15 to 30 continuous trips during a power failure.
Final Thoughts: Restoring Safe Home Mobility
Investing in professional stair lift installation transforms multi-story home challenges into safe, effortless independence. By choosing certified local installers over risky DIY kits, you guarantee ASME safety compliance, complete warranty protection, and long-term peace of mind.
| ★ SCHEDULE YOUR FREE IN-HOME ASSESSMENT Ready to make your stairs safe and accessible again? Schedule a free in-home staircase assessment with our certified local technicians today. We will measure your staircase, discuss clearance options, and provide a transparent, all-inclusive quote! |